
Concrete Slump Test
What is the Concrete Slump Test?
The concrete slump test is a field procedure measuring fresh concrete’s consistency and workability. Developed in 1918 by Duff Abrams, this test evaluates how easily concrete flows and consolidates during placement. It remains indispensable for quality control, ensuring batches meet structural requirements before pouring.
Why Slump Testing Matters
Workability Indicator: Slump values directly correlate with concrete’s ability to fill formwork and encapsulate reinforcement without segregation.
Quality Assurance: Deviations from specified slump may signal incorrect water-cement ratios, risking strength loss or cracking.
Compliance: ASTM C143/AASHTO T119 standards mandate slump testing for structural concrete validation.
Equipment and Preparation
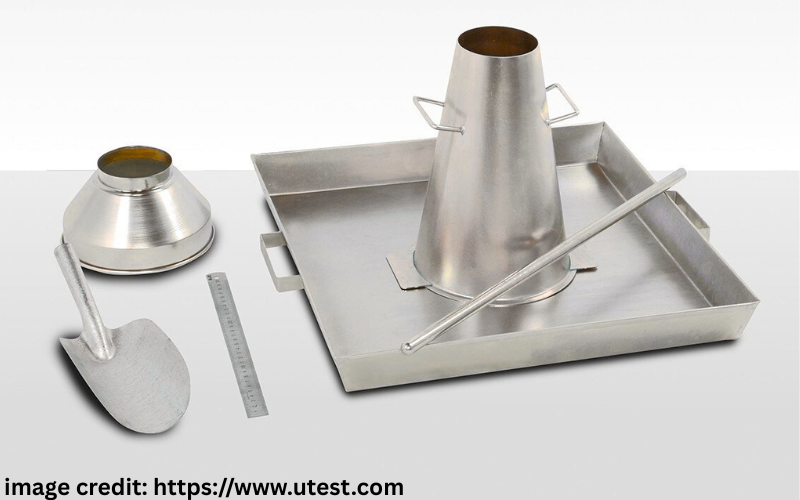
Conducting a slump test requires:
Slump Cone: Frustum-shaped mold (100mm top Ø, 200mm base Ø, 300mm height).
Base Plate: Non-absorbent, rigid surface.
Tamping Rod: 16mm-diameter steel rod with hemispherical tip.
Tape Measure: For precision slump measurement.
Preparation Steps:
Dampen the cone and base plate to reduce friction.
Position the cone on a vibration-free, level surface.
Step-by-Step Test Procedure
Follow ASTM C143 guidelines for accuracy:
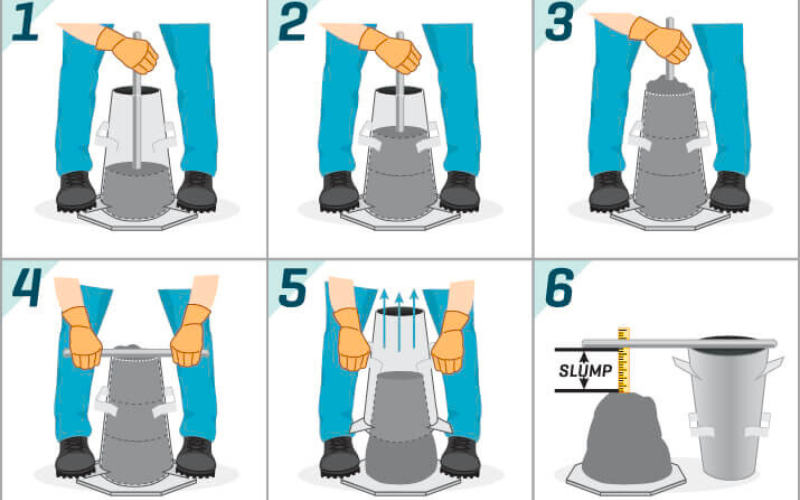
1. Filling the Cone
Layer 1: Fill ⅓ of the cone, rod 25 times vertically (penetrating the base layer).
Layer 2: Repeat for the middle layer (rod penetrates prior layer by 25mm).
Layer 3: Overfill the cone, rod until surface is level.
2. Removing the Cone
Lift vertically within 5–10 seconds without lateral motion.
3. Measuring Slump
Record the height difference between the cone and concrete’s highest point.
Measure to the nearest 5mm (0.25 inches).
Critical Tip:
"Mark the cone’s exterior at 70mm and 160mm depths to standardize layer volumes" – Gilson Co..
Interpreting Slump Results
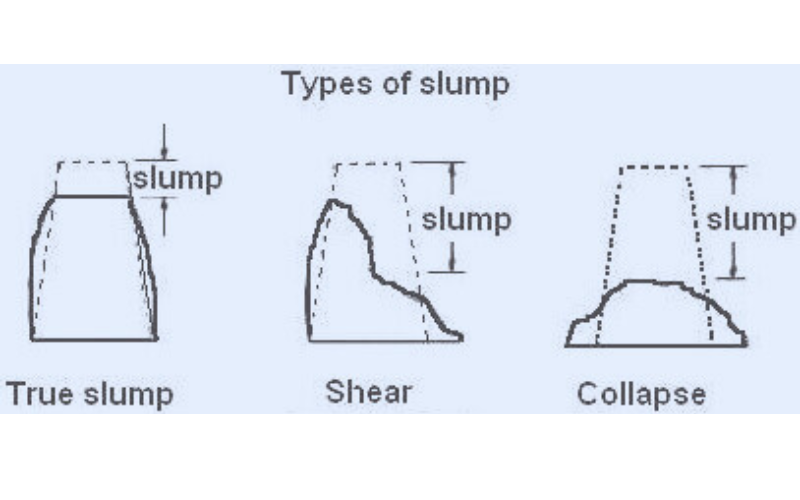
Four slump types determine concrete suitability:
| Slump Type | Appearance | Indication | Action Required |
|---|---|---|---|
| True Slump | Uniform subsidence | Ideal workability | Accept batch |
| Shear Slump | One side shears off | Low cohesion | Retest or reject |
| Collapse | Concrete spreads excessively | Excess water | Reject immediately |
| Zero Slump | No deformation | Too dry for placement | Adjust mix design |
Target Slump Values by Application
| Application | Ideal Slump (mm) | Workability |
|---|---|---|
| Pavements/Roads | 0–25 | Very Low |
| Lightly reinforced foundations | 25–65 | Low |
| Standard slabs/walls | 65–100 | Medium |
| Complex reinforced structures | 100–175 | High |
Factors Affecting Slump Accuracy
Operator Technique: Lifting speed or uneven rodding skews results.
Environmental Conditions: High temperatures accelerate slump loss.
Aggregate Properties: Angular aggregates reduce workability versus rounded ones.
Pro Tip:
"Test within 15 minutes of batching – delays alter slump due to hydration" – Deslauriers, Inc..
Common Testing Errors to Avoid
Incorrect Rodding: Using non-standard rods (e.g., rebar) displaces aggregates4.
Non-Level Surface: Tilting the cone invalidates measurements.
Partial Lifting: Incomplete cone removal causes "false shear" readings.
Advanced Applications
High-Fluidity Concrete
For self-consolidating concrete (SCC), the slump-flow test replaces standard slump testing. This measures spread diameter (typically 500–700mm) to assess flow without segregation.
Pumped Concrete Optimization
Ideal Slump: 75–100mm ensures smooth pumping without blockages.
Adjustments: Superplasticizers increase slump without adding water.
"Slump tests are the frontline defense against placement failures in congested rebar zones" – Concrete Network.
Frequently Asked Questions
What are the main limitations of the slump test?
The slump test is best suited for conventional concrete mixes and may not accurately reflect the workability of mixes with very low or very high fluidity, such as self-consolidating concrete (SCC). It also does not provide information on the cohesiveness or segregation resistance of the mix. For SCC or highly flowable mixes, the slump-flow test is preferred. For very stiff mixes, alternative workability tests like the compacting factor test or Vebe test are recommended.
How does the slump test relate to concrete strength?
While a higher slump generally indicates a more workable mix, it does not directly measure concrete strength. Excessive slump can signal too much water, which may reduce final compressive strength. Conversely, a very low slump may make placement difficult and lead to honeycombing or voids. Always correlate slump with the specified mix design and required strength.
Can admixtures affect slump test results?
Yes, chemical admixtures such as superplasticizers and water reducers can significantly increase slump without changing the water-cement ratio. This allows for high workability without compromising strength. Always note the use of admixtures when interpreting slump test results.
How often should slump tests be performed on a construction site?
Slump tests are typically performed:
At the start of each concrete pour
Whenever there is a change in mix design, materials, or batching process
When visual inspection suggests a change in workability
What are common mistakes during the slump test?
Not filling the cone in three equal layers
Inadequate or excessive rodding
Lifting the cone too slowly or quickly
Performing the test on an uneven or absorbent surface
Not cleaning the cone between tests

 Report Interpretation")


